Roasted Delicata Squash/Great Thanksgiving Side Dish!

012

Recently I discovered that I’m in love with delicata squash.  My friend and excellent cook Barbara Westerman suggested I try it.  WOW,  she was right!   While in the squash family, it has a taste entirely of its own.  In addition to the taste, there are several reasons why I absolutely love it.  First, there is no peeling involved, the skin edible, it’s tender and delicious.  Secondly, it’s easy to cut in half, no power tools needed to break into it.  Thirdly,  preparation is incredibly simple.  Lastly, it’s beautiful on the plate, it would be a lovely side dish to serve with roasted turkey,  roasted pork, chicken or fish.

The squash I bought was about 7-9″ in length and 3″ across.  Like other squash, the larger and older it gets,  flavor is lost and it’s less tender, so buy this size or smaller.

006
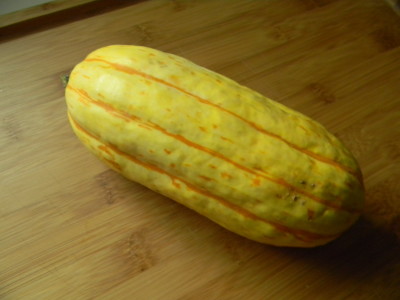
Look for firm skin with no blemishes.  The first step is the most critical.  Wash it thoroughly, rubbing the skin with your hands or with a vegetable brush under running water.  It grows on the ground and a little sand will ruin your whole experience.

007

Preheat the oven to 350′.  Cut the ends off, slice in half and remove the seeds.  Slice into 1/4″ slices.010
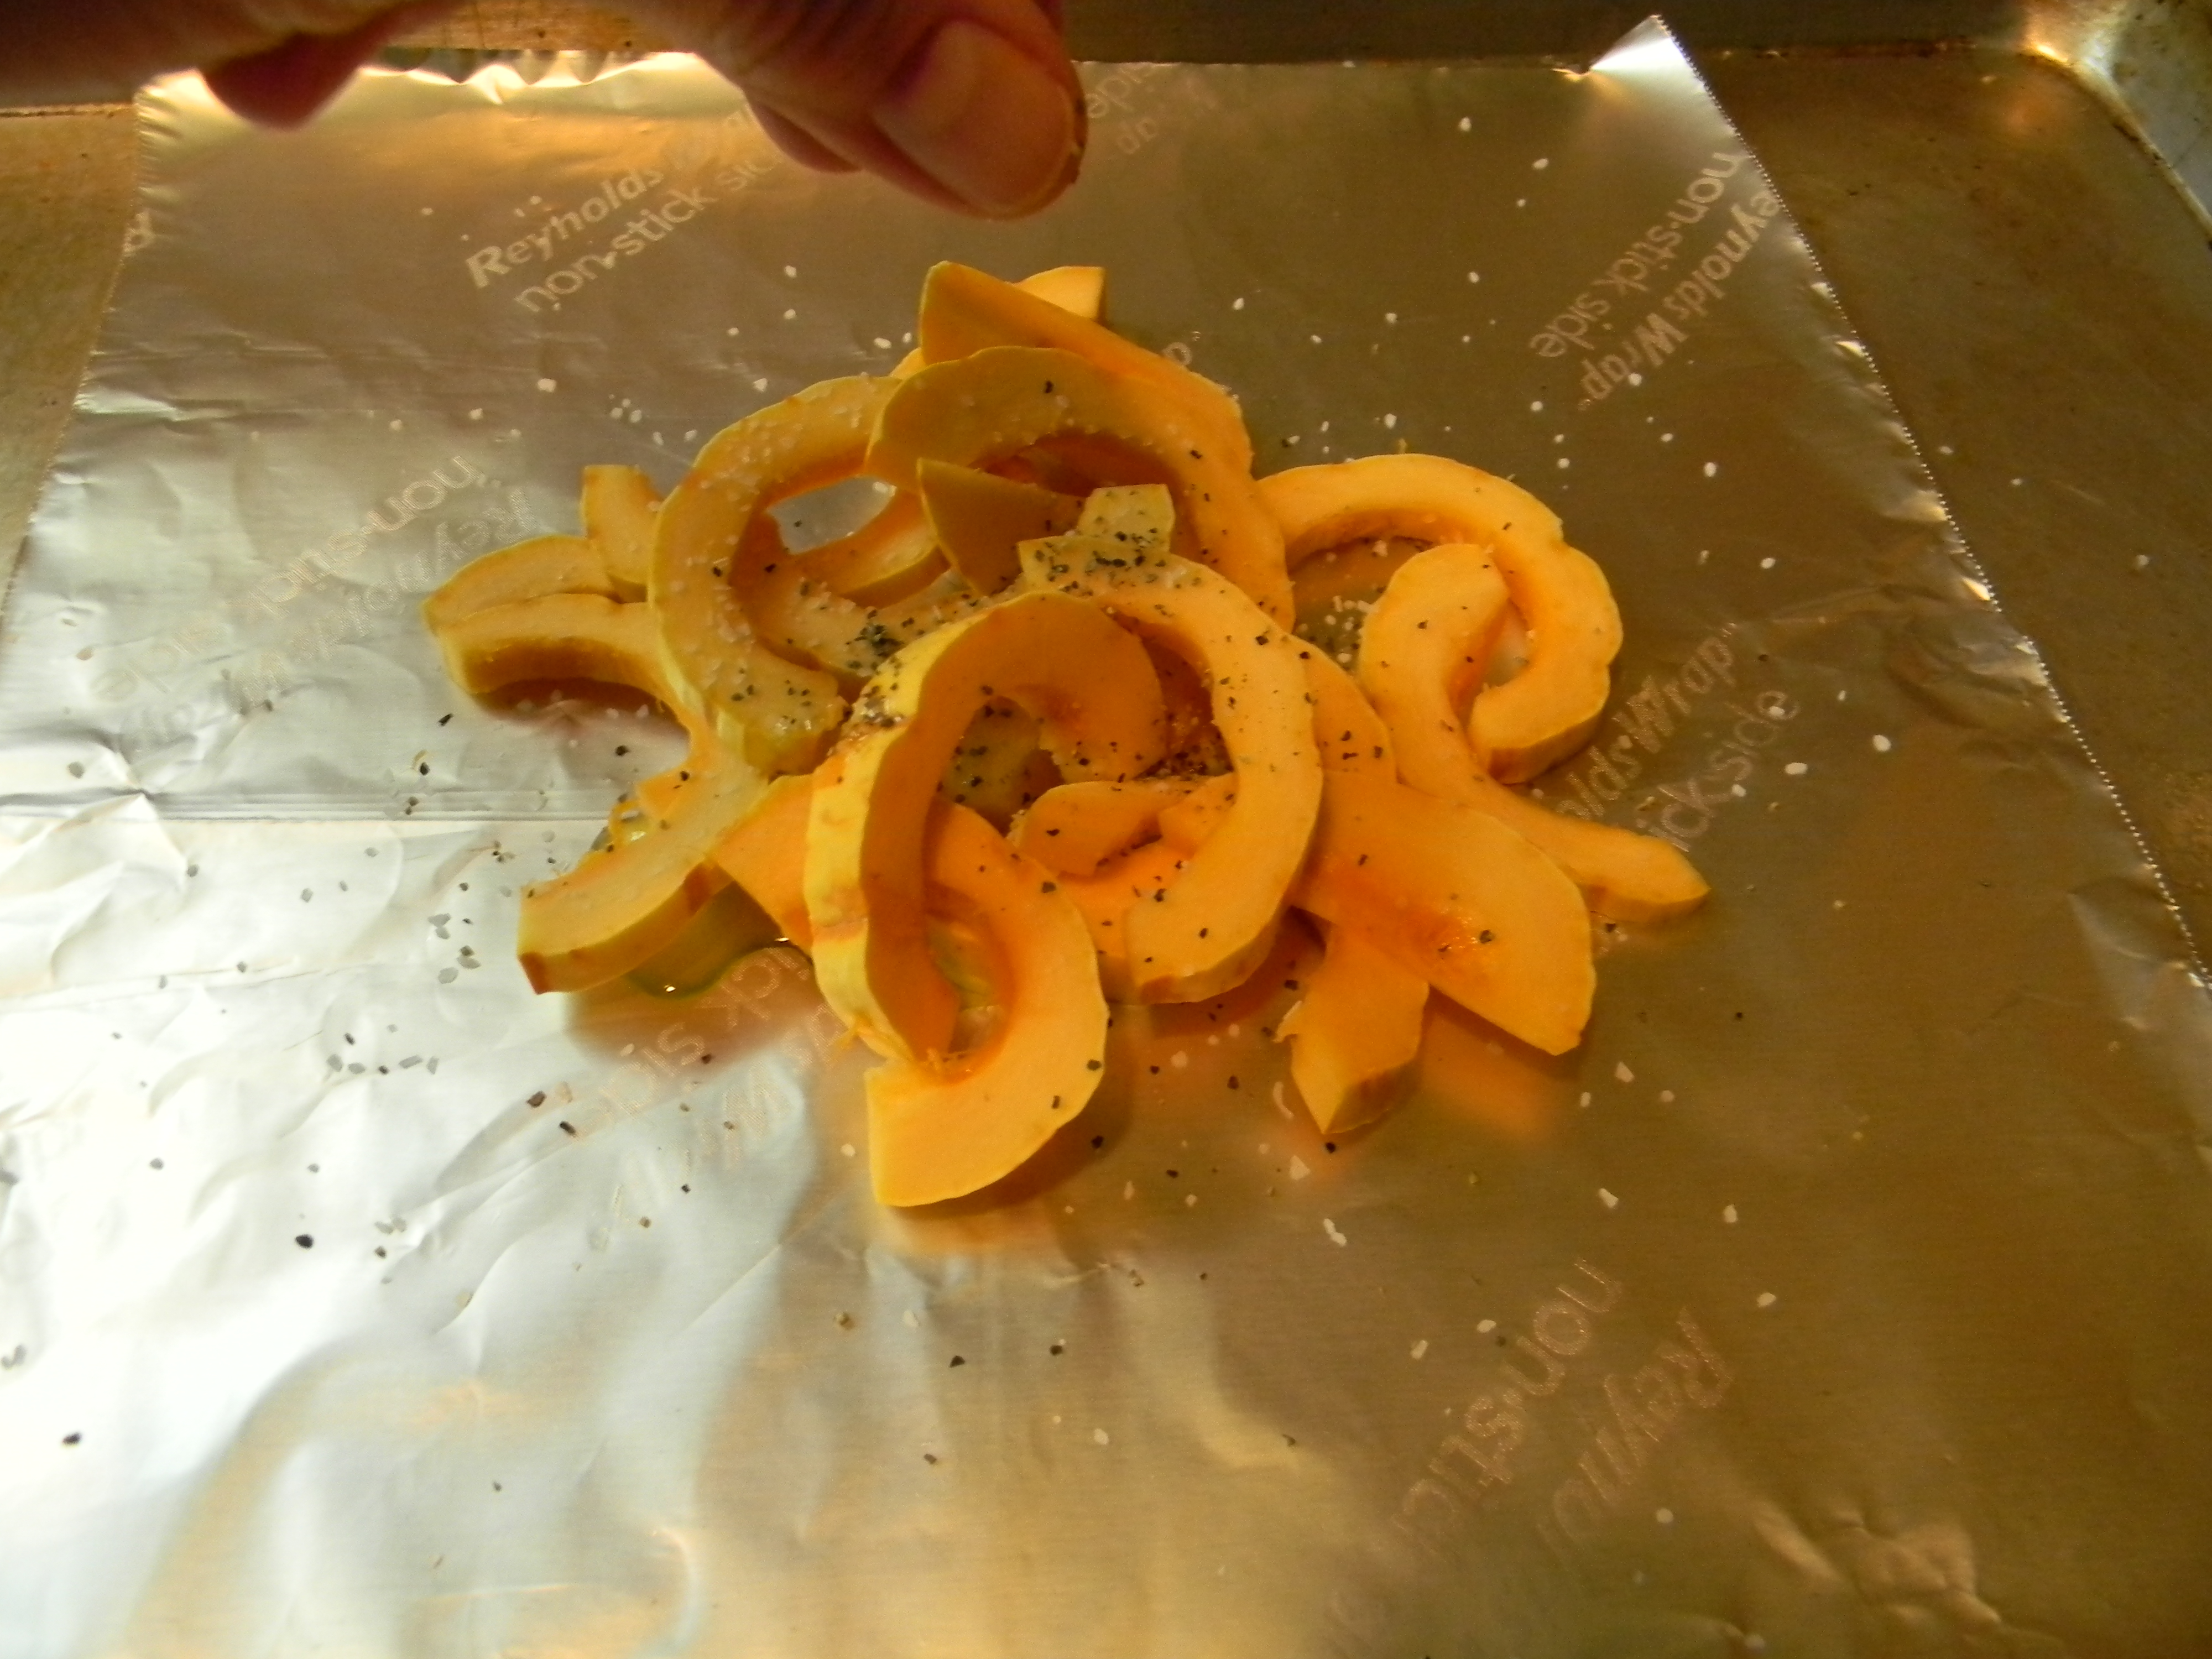
Drizzle with olive oil and season with salt and pepper.  For a twist, you could season with chili powder or smoked paprika.

011
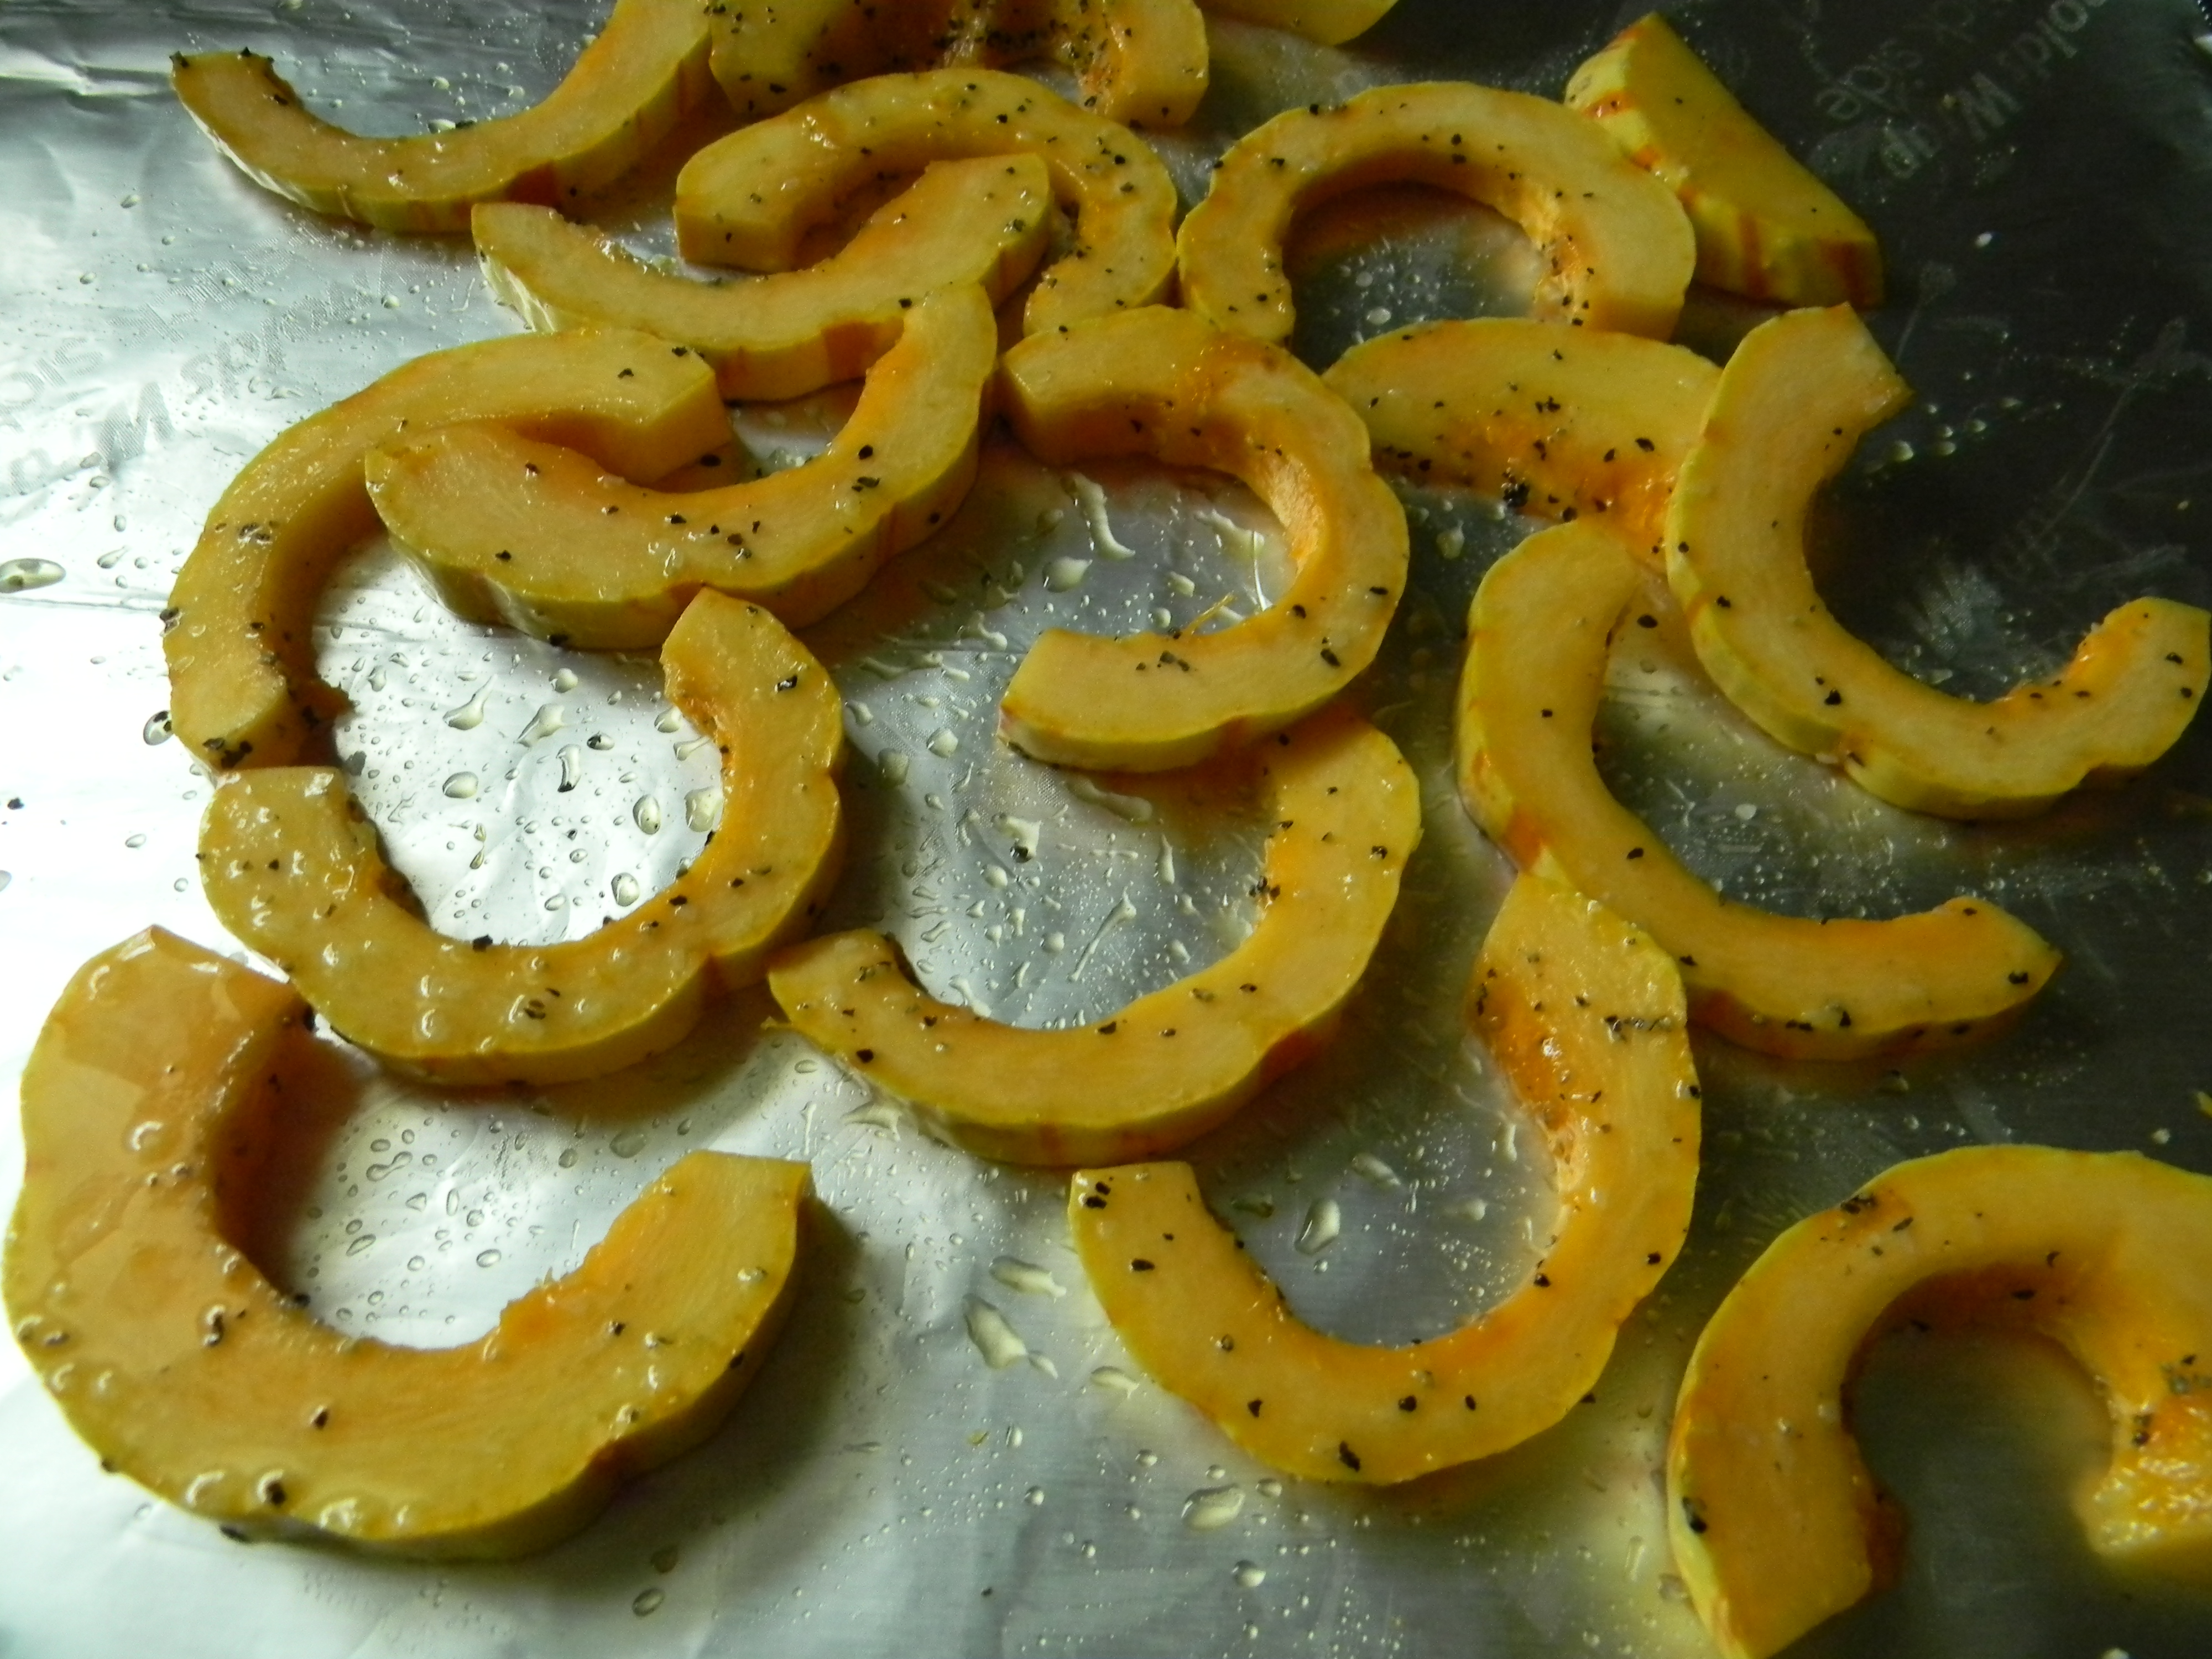
Toss to coat evenly and spread over a foil lined cookie sheet.  I like Reynold’s non stick foil.  Roast for 15-20 minutes.

012Simple.  Delicious. Healthy.  Beautiful.

Enjoy!

Angie

PS-Can be made ahead and re-warmed.  Enjoy cold as a healthy and delicious snack!

Baja Fish Tacos with Avocado Cream and Fresh Cilantro Salsa…..

My family LOVES this dish.  What is it about being able to assemble your dinner that is so appealing to kids?  Whatever it is, I love when they go for a healthy meal such as this one.  There is some prep involved, but you can make the avocado cream and the salsa a day or two ahead.  Feel free to use bottled salsa.  The fish takes minutes.

We’ll start with the avocado cream….

Cut the avocado in half.  Carefully score the inside of the avocado as pictured.  Squeeze the skin side together and the avocado will easily come out. 

Put the avocado right into the food processor, I’m using a mini Cuisinart.
Add low fat plain yogurt….
Mayonnaise….
Lime juice…
Honey….
Fresh cilantro, kosher salt, and water….Give it a whirl until smooth….
It should look like this.
Cover the avocado cream with plastic wrap before putting sealing with the lid.  this will keep the air out and will keep it from turning brown.  Do this with guacamole as well.
For the salsa…
You will need a large can of petite diced tomatoes, fresh cilantro, fresh onion, lime juice (fresh or bottled) a small green pepper, seeded and chopped, a jalepeno, granulated garlic powder, and salt…Add half of the canned tomatoes to a food processor, once smooth, add the remaining diced tomatoes for a chunky texture.
Fresh and delicious!  Refrigerate until you’re ready to use.
For the fish….

You’ll need to make the Baja rub for the fish.  Double or even triple this recipe and save it for the next time.  Be sure to separate what you’re going to save before you start seasoning the fish so you do not contaminate the rub you will be saving.  Label and date.  Seasonings needed are:  brown sugar, chili powder, cumin, granulated garlic powder, sweet paprika, oregano, cayenne, salt, and allspice.

Mix all ingredients together and break up any lumps with your fingers.

You’ll need 6 tilapia fillets, rinsed and patted dry with a paper towel.  Brush each fillet with canola oil.

Season each piece of fish with the rub mixture.

 Each piece of fish should be well coated…Heat a non stick skillet with canola oil over medium high heat until very hot.

Cook fish for 4 minutes per side, try not to crowd the fish.
The brown sugar in the rub will caramelize the fish a bit…delicious on its own….wait until you taste the avocado cream, fresh salsa, and spicy flavors of the fish…  it’ll knock your socks off!

Flake the fish with a fork.  Squeeze fresh lime juice over the fish.  Now you’re ready to eat!

Baja Fish Tacos with Avocado Cream and Fresh Cilantro Salsa

For the Avocado Cream:
1 whole ripe avocado, cut into chunks
2 tablespoons low fat plain yogurt
1 tablespoon mayonnaise
1 tablespoon lime juice, fresh or bottled
1 tablespoon honey
1 small bunch cilantro
2 pinches of kosher salt
¼ cup water

Place all ingredients into a food processor and give it a whirl until smooth. Cover with plastic wrap and refrigerate until ready to use. Good for one week refrigerated.

For the Fresh Salsa:
1 28 ounce can petite diced tomatoes
1 whole jalapeño
1 small onion or ¼ of large
1 small bunch fresh cilantro
½ teaspoon granulated garlic powder
3 pinches of kosher salt

Place HALF of canned tomatoes into food processor. Add HALF of the jalapeño, seeds and all. Add the rest of the salsa ingredients. Whirl until smooth. Taste. If you’d like more heat, add the rest of the jalapeño pepper and process until smooth. Pour into mixing bowl and add the rest of the canned tomatoes. Mix and taste. Season with more salt if necessary. Refrigerate up to two weeks.

For the Fish:
6 tilapia fillets, rinsed and dried with a paper towel
1-2 tablespoons canola oil for coating fish

Rub:
1 ½ teaspoons brown sugar
1 ½ teaspoons chili powder
1 teaspoon cumin
1 teaspoon oregano
¾ teaspoon granulated garlic powder
¾ teaspoon sweet paprika
¼ teaspoon ground cayenne pepper
¼ teaspoon ground allspice
½ teaspoon kosher salt

2 tablespoons canola oil for cooking

1 fresh lime, cut into wedges
2 cups shredded lettuce
2 plum tomatoes, seeded and finely diced
1 cup shredded cheddar cheese
12 soft corn tortillas or hard corn shells

1) Mix all rub ingredients together in a small bowl. Brush fish fillets with oil. Coat both sides of fish generously with the rub. Heat a non stick pan over medium-high heat with oil. Cook fish in the hot pan, do not crowd, for 4 minutes per side.
2) Remove from heat onto a platter, flake with a fork. Squeeze fresh lime juice over fish. Cover with foil to keep warm.
3) Wipe out fish pan and warm tortillas one minute per side in the pan and place into a bowl lined with a clean napkin or kitchen towel to keep warm.
4) Layer over warm tortilla; lettuce, tomato, cheese, fish, avocado cream, and salsa. Serves 4.  Enjoy!

Sweet Potato and Parsnip Latkes….

I am elated that one of my recipes was featured on The Pioneer Woman.  Ree Drummond’s site is a treat to visit!  Click on Tasty Kitchen to view thousands of recipes!  Speaking of recipes, I adore this one!

Sweet Potato and Parsnip Latkes.  What is a latke?  It’s a potato pancake.  I gave it a little twist by using sweet potatoes and parsnips in lieu of white potatoes.  In addition to being incredibly delicious, they’re also good for you!  At this time of year I feel the need to change up recipes in the starch rotation. I especially love serving them with a nice piece of grilled or baked fish, alternatively, they would be excellent with roasted chicken.  Traditional latkes are fried in quite a bit of oil.   I bake them on high heat with a little oil, resulting in a lighter, yet crispy result.

I recommend using a food processor to shred the vegetables, they’re done in minutes.  If you do not have a food processor, you can grate the vegetables on a box grater.  You may want to get out the head and wrist bands, it’s quite a work out!

Sweet Potato and Parsnip Latkes

2 tablespoons olive oil
2 medium size sweet potatoes, peeled and shredded
2 large parsnips, peeled and shredded
1 small onion, peeled and shredded
½ cup chopped parsley
1/3 cup flour
¼ teaspoon baking powder
½ teaspoon kosher salt
¼ teaspoon pepper
2 eggs
Sour cream
Green onions, thinly sliced

1) Preheat oven to 375’. Non stick foil line a cookie sheet and drizzle with 2 tablespoons of olive oil, spread with your hand to coat pan well. Set aside.
2) Shred the sweet potato, parsnips, and onion in a food processor or on a box grater. Place into a large mixing bowl. Add parsley.
3) Sprinkle all dry ingredients over sweet potato mixture. Add eggs and mix all ingredients together well combined.
4) Shape into 12 three inch patties and place on prepared cookie sheet. Pat the tops flat with a spatula. Bake for 25 minutes, carefully flip and bake an additional 10 minutes. Serves 6, two patties per person.  Serve with a dollop of sour cream and a sprinkle of green onions.

*To lighten sour cream, measure equal parts sour cream and non fat Greek yogurt, whisk to blend.   Ever read the ingredient list on light sour cream compared to regular??

DE-LISH!

Angie

White Bean Soup with Ham Bone….

My Grandma Inez always made white bean soup. It was the best tasting soup I can remember.  She used ham bones or ham hocks.  She was an amazing, old fashioned cook.  I loved her and I miss her so much.  This is a lovely way to keep her memory alive, isn’t it?  I always think of her when I make it.  This is my version of her white bean soup.

Don’t you love a dish you can just throw together in one pot?   When using dried beans, they need to be soaked overnight, rinsed, and drained before cooking.   I use a ham bone or you can use a ham hock for flavor, just like Grandma.   If you don’t don’t care to use a ham bone or a hock, use chicken stock instead of water for the liquid.  Make enough to freeze and enjoy later.

Here we go…

First sort the beans to remove any unwanted debris.  Soak overnight.  Simple put the beans in the pot you’ll be cooking them in and cover with about 3 inches of water.  You can see how much they’ve increased in size through re hydrating.  This will greatly decrease cooking time.  Drain and rinse.

My beans are ready….
Add the onions, celery, carrots, garlic and ham bone….
Add rosemary…..
And finally, add the water.  Bring to a simmer and cook for an hour or until the beans are soft.
Once the beans are fully cooked, remove the bone from the soup.  Cool until you can handle the bone and remove any bits of meat from the bone.  Add the meat to the soup and discard the bone.  Enjoy with Fresh Sage Cornbread. 

White Bean Soup with Ham Bone and Rosemary

1 pound of great northern beans, sorted, rinsed, and soaked covered with water over night
1 ½ cups celery and leaves, finely chopped
1 ½ cups onions, finely chopped
1 ½ cups carrots, finely chopped
1 ham bone or smoked ham hock
3 large cloves garlic, minced
1 tablespoon dried rosemary
8 cups water
½ cup chopped parsley
Salt and pepper to taste

1) Add all ingredients to the beans in the soup pot. Over medium heat, bring soup to a simmer. Cook for an hour, stirring occasionally, or until the beans are soft (this will require a taste). Remove the ham bone and pick off any meat and put into the soup, discard the bone. Add parsley. Taste before you season with salt and pepper.   Makes eight servings.

*note-sometimes dried beans you buy have been on the shelf for awhile.  This makes for a much longer cooking time.  Be patient.  Add additional water and keep cooking until the beans are tender. 
**this soup freezes well.

Enjoy!

Angie

Vegetarian Curried Lentel Soup….

After all the blustering about homemade stocks this one calls for water.  I love the simplicity of this soup.  Ready in only about 60 minutes.  Vegetarian, delicious, simple, flavorful.  Add any miscellaneous veggies you have hanging around in the refrigerator.  Feel free to add leftover rice or barley. 

Here we go…

First and foremost, you have to sort through the dried lentils.  You will find a few not so pretty ones but also be looking for small debris like stones.  Rinse well.

Next finely chop 1/2 cup each celery, carrots, and onion.  Add to your heavy soup pot over medium heat with a couple of tablespoons of olive oil.  Saute for about 10 minutes.

Add 4 large cloves of minced garlic and cook another minute.

Veggies should look like this….

Add the water, salt, and pepper, and begin to simmer over medium heat.  The lentils should cook in about 30-40 minutes.  Once the lentils are soft, put the chick peas, lemon juice, water, and parsley into a food processor and process until smooth.
Add to the soup….

Enjoy with crusty french bread or corn muffins (recipe below).  YUMMY!

Curried Lentil Soup

2 tablespoons olive oil
½ cup diced celery
½ cup diced carrot
½ cup diced onion
4 large cloves garlic, minced
9 cups water
1 tablespoon curry powder
2 cups lentils, sorted and rinsed
1 15 ounce can chick peas, drained and rinsed
2 tablespoons lemon juice
¼ cup water
¼ cup parsley
1 teaspoon salt, or to taste
½ teaspoon pepper

1) Heat a heavy and large soup pot over medium heat. Add olive oil. Add celery, carrot, and onion. Sauté for about 10 minutes or until vegetables are soft. Add garlic and cook another minute.
2) Add water, curry powder, and rinsed lentils. Simmer for 35-45 minutes or until lentils are soft. If the water is getting low, add a cup at a time. You want it to be more stew-like. Taste the lentils after about 30 minutes of cooking for doneness.
3) Put the chick peas, lemon juice, ¼ cup water, and parsley into food processor. Process until smooth. Add to the soup when the lentils are done. Serves 8.
*If you do not have a food processor, add a cup of prepared hummus.
*If you don’t care for curry, simply omit. 

Caramelized Cabbage….

This is a delicious side dish with a vegetable that is readily available at any time of year.  When you cook the cabbage this way it caramelizes.  Caramelizing brings out the natural sugars in foods so there is a natural sweetness to the dish.  Try tossing with cooked linguine and fresh grated parmesan cheese for a delicious vegetarian main dish.

Caramelized Cabbage

1 small head of cabbage, core removed and thinly sliced
2 tablespoons olive oil
1 tablespoon butter
Salt and pepper
Dried parsley flakes

1)  In a large heavy deep pot, add oil and butter and heat over medium heat.
2)  Add cabbage all at once.  It will seem like a lot of cabbage, don’t worry, it really cooks down.  Season with a couple of pinches of salt and pepper.  Stir often.  It will take 20-30 minutes to cook down and get caramelized.  Be careful towards the end of cooking as the sugars will burn easily.  Garnish with a sprinkle of parsely flakes if you wish.  Enjoy!

Brussel Sprouts, Pan Roasted with Bacon….

Why not serve these beauties as an elegant side for Thanksgiving dinner?  These are one of my favorite vegetables.  Caramelizing the brussel sprouts makes them sweet while the bacon adds a smokey and salty element.  Soooooo tasty!

Pan Roasted Brussel Sprouts

2 strips bacon, cut into 1/2″ pieces
1 lb. brussel sprouts, stems removed and cut in half
salt and pepper
1/2 cup water

1)  In a large skillet that has a lid, cook bacon until crispy.  Remove from pan and drain on paper towels.
2)  Add brussel sprouts immediately to the hot pan with the bacon fat.  Season with a pinch of salt and pepper.  Cook for about 5 minutes or until the brussel sprouts are nicely browned.
3)  Add 1/2 cup water and cover with tight fitting lid.  Steam for 5 minutes.
4)  Top with the cooked bacon.  Serve immediately.

Lima Bean Salad with Zucchini….

This is a great salad to enjoy while we have such excellent zucchini around.  I just love different salads, I get bored with the typical lettuce/tomato/cucumber salad.  I use frozen baby lima beans, simply cook for about 8 minutes, drain and cool.  This is a great side to chicken or fish.  Enjoy!
Lima Bean Salad with Zucchini
1 16 ounce package lima beans, cooked, drained, and cooled
2 small zucchini, cut into small pieces
1 small red onion, diced
1 medium red pepper, seeded and diced
1 small bunch Italian parsley, chopped
2 tablespoons olive oil
1/2 teaspoon salt
1/2 teaspoon granulated garlic powder
1/4 teaspoon pepper
1 tablespoon red wine vinegar
1)  Using a large mixing bowl, add cooled lima beans through olive oil.  Toss gently to coat. 
2)  Add salt, garlic powder, and pepper.  Toss to coat.
3)  Add vinegar and mix well.  Makes about 10 1/2 cup servings.


Baked Tortilla Chips and Strips…..

Baked Tortilla Chips
Baked Tortilla Strips are great in salads

Why not bake your own tortilla chips?  They’re much less expensive and have only 3 ingredients.  You will notice a big difference between these homemade chips and commercial ones, they have a true corn taste. You could also spice them up if you wanted to with a little chili powder and cumin, or a pinch of cayenne.

I love the baked tortilla strips.  When I make tacos for my kids I make a taco salad for myself with just a few of these.  Try these crunchy salad yummies on my Grilled Chicken Salad with Jicama.  Make a nice amount and store in an air tight container or a zip bag and they’re ready to go the next time you need them. 

Baked Tortilla Chips or Strips

1 dozen corn tortillas, for chips cut into 4’s, or cut into thin strips
1 teaspoon canola or olive oil
2-3 pinches of kosher salt

1) Preheat oven to 300’.
2) Place cut tortillas into a medium size mixing bowl. Drizzle olive oil over and add salt. Toss carefully with your hands to evenly coat. Spread the chips/strips over a cookie sheet being careful not to overlap. You will have to bake in a couple of batches. Bake for 20-22 minutes or until completely dry. Cool completely and store in an air tight zip bag or container.

*Serve chips with your favorite dip or strips over salads

Oven French Fries….

Who doesn’t love french fries?  Hard to believe that it takes a few basic ingredients to make these.   Crispy oven french fries that actually taste like a potato, how original!  My kids go crazy over these.  Season them however you like.  Load up on the garlic or make them spicy with a few pinches of ground cayenne pepper.  Either way, guilt free french fries.  Zero trans fat.  Zero unpronounceable ingredients. Zero deep frying.  Enjoy!
Oven French Fries

4 large russet potatoes with skins or 2 lbs. potatoes
2 tablespoons canola or olive oil
½ teaspoon granulated garlic powder
1 teaspoon kosher salt
¼ teaspoon pepper
2 tablespoons flour
2 teaspoons dried parsley

1) Line a baking sheet with 1” sides with Reynold’s non stick foil. (this is key) Set aside.
2) Wash potatoes and slice into ½” fries. Place in a large bowl and cover with water. Allow to soak for 20 minutes to an hour. (This removes much of the starch and allows for them to get crispy while in the oven.)
3) Preheat oven to 425’. Thoroughly drain potatoes in a colander, shake them up to release as much water as possible.
4) Put potatoes into dry bowl. Drizzle 1 tablespoon of oil over, toss. Sprinkle garlic powder, salt, and pepper over potatoes and toss to coat. Sprinkle flour over potatoes and toss to evenly coat.
5) Spread out over cookie sheet without overlapping. Drizzle remaining tablespoon of oil over potatoes.
6) Bake for 25 minutes, remove from the oven and carefully give them a turn. Place back into the oven for an additional 15-20 minutes or until browned to your liking.

Sprinkle parsley over potatoes. Serve immediately.